Stream Processing with RabbitMQ
In this guide, we develop three Steeltoe applications that use Steeltoe Stream's support for RabbitMQ and deploy them to Cloud Foundry and to Kubernetes. In another guide, we deploy these applications using Data Flow. Taking the time to deploy the applications manually will provide you with a better understanding of the steps that Data Flow automates for you.
The following sections describe how to build these applications from scratch. If you prefer, you can clone the Steeltoe sample applications, and proceed to the deployment section.
Development
This guide will walk through creating three Steeltoe Stream applications that communicate by using RabbitMQ, using the scenario of a cell phone company creating bills for its customers.
Each call made by a user has a Duration and an amount of Data used during the call.
As part of the process to generate a bill, the raw call data needs to be converted to a cost for the duration of the call and a cost for the amount of data used.
The call is modeled using the UsageDetail class that contains the Duration of the call and the amount of Data used during the call.
The bill is modeled using the UsageCostDetail class that contains the cost of the call (CostCall) and the cost of the data (CostData). Each class contains an ID (UserId) to identify the person making the call.
The three streaming applications are as follows:
UsageDetailSender: aSourceapplication that generates the users' callDurationand the amount ofDataused for eachUserId. Sends messages containingUsageDetailobjects as JSON.UsageCostProcessor: aProcessorapplication that consumesUsageDetailand computes the cost of the call and the data perUserId. Sends messages containingUsageCostDetailobjects as JSON.UsageCostLogger: anSinkapplication that consumesUsageCostDetailobjects and logs the cost of the call and data.
Source
In this step, we create the UsageDetailSender Source project. Create a new .NET Console project and add the NuGet packages as described below.
Add NuGet Reference
In order to make each of the three projects Steeltoe Stream applications, you need to add references to the following packages:
| Package | Description | .NET Target |
|---|---|---|
Steeltoe.Stream.StreamBase |
Provides StreamHost extensions, base functionality and dependency injection support | ASP.NET Core 3.1+ |
Steeltoe.Stream.Binder.RabbitMQ |
Binder that connects Steeltoe abstractions with RabbitMQ | ASP.NET Core 3.1+ |
To add this type of NuGet to your project, add a PackageReference resembling the following:
<ItemGroup>
    <PackageReference Include="Steeltoe.Stream.StreamBase" Version="3.*" />
</ItemGroup>
Business Logic
Now we can create the code required for this application. To do so:
- Create a
UsageDetailclass in the project.
  public class UsageDetail
  {
      public string UserId { get; set; }

      public long Duration { get; set; }

      public long Data { get; set; }
  }
- Create the
UsageGeneratorclass in the project, which resembles the following listing:
using Microsoft.Extensions.Hosting;
using Microsoft.Extensions.Logging;
using Steeltoe.Messaging;
using Steeltoe.Messaging.Handler.Attributes;
using Steeltoe.Messaging.Support;
using Steeltoe.Stream.Attributes;
using Steeltoe.Stream.Messaging;
using System;
using System.Threading;
using System.Threading.Tasks;

namespace UsageSender
{
    [EnableBinding(typeof(ISource))]
    public class UsageGenerator : BackgroundService
    {
        private readonly ISource _source;
        private readonly ILogger<UsageGenerator> _logger;
        private static readonly Random RANDOM = new Random();

        public string ServiceName { get; set; } = "UsageGenerator";
        private string[] users = { "user1", "user2", "user3", "user4", "user5" };

        public UsageGenerator(ISource source, ILogger<UsageGenerator> logger)
        {
            _source = source;
            _logger = logger;
        }

        protected override async Task ExecuteAsync(CancellationToken stoppingToken)
        {
            while (!stoppingToken.IsCancellationRequested)
            {
                var message = GenerateAndSend();
                _source.Output.Send(message);

                await Task.Delay(5000, stoppingToken); // Wait 5 seconds before sending again
            }
        }

        [SendTo(ISource.OUTPUT)]
        protected virtual IMessage GenerateAndSend()
        {
            var value = new UsageDetail
            {
                UserId = users[RANDOM.Next(5)],
                Duration = RANDOM.Next(300),
                Data = RANDOM.Next(700)
            };

            _logger.LogInformation("Sending: " + value);
            return MessageBuilder.WithPayload(value).Build();
        }
    }
}
The [EnableBinding] attribute indicates that you want to bind your application to messaging middleware.
The attribute takes one or more interfaces as a parameter, in this case, the ISource interface that defines an output channel named output.
In the case of RabbitMQ, messages sent to the output channel are in turn sent to the RabbitMQ message broker by using a TopicExchange.
Deriving from BackgroundService and calling Task.Delay makes the UsageGenerator a background task that gets called by the framework every 5 seconds.
In every iteration of the loop, The GenerateAndSend method constructs a UsageDetail object which is sent to the output channel by accessing the _source object's Output.Send() method.
Configuration
When configuring the ISource application, we need to set:
- The
outputbinding destination (RabbitMQ exchange) where the producer publishes the data. - The
requiredGroupsto specify the consumer groups to ensure the message delivery to consumer applications.
In appSettings.json, you can add the following properties:
{
    "Spring": {
      "Cloud": {
        "Stream": {
          "Bindings": {
            "Output": {
              "Producer": { "RequiredGroups": "usage-cost-customer"},
              "Destination": "usage-detail"
            }
          }
        }
      }
    }
}
- The
Spring:Cloud:Stream:Bindings:Output:Destinationproperty binds theUsageDetailSenderobject's output to theusage-detailRabbitMQ exchange. - The
Spring:Cloud:Stream:Bindings:Output:Producer:RequiredGroupsproperty makes sure to create a durable queue namedusage-detail.usage-cost-consumer, which consumes from theusage-detailRabbitMQ exchange.
Durable Queues
By default, the Steeltoe Stream consumer application creates an anonymous auto-delete queue.
This can result in a message not being stored and forwarded by the producer if the producer application started before the consumer application.
Even though the exchange is durable, we need a durable queue to be bound to the exchange for the message to be stored for later consumption.
Hence, for guaranteed message delivery, you need a durable queue.
To pre-create durable queues and bind them to the exchange, the producer application should set the following property:
Spring:Cloud:Stream:Bindings:<ChannelName>:Producer:RequiredGroups
The RequiredGroups property accepts a comma-separated list of groups to which the producer must ensure message delivery.
When this property is set, a durable queue is created by using the <Exchange>.<RequiredGroup> format.
Processor
In this step, we create the UsageProcessor processor. Create a new .NET Console project and add the NuGet packages as referred in the Add NuGet reference
Business Logic
Now we can create the code required for this application. To do so:
- Create a
UsageDetailclass in the project that looks like the listing below. Note that Steeltoe supports sharing your models via NuGet package, shared code or independently maintained models.
  public class UsageDetail
  {
      public string UserId { get; set; }

      public long Duration { get; set; }

      public long Data { get; set; }
  }
- Create the
UsageCostDetailclass.
  public class UsageCostDetail
  {
      public string UserId { get; set; }

      public double CallCost { get; set; }

      public double DataCost { get; set; }
  }
- Create the
UsageCostProcessorclass which receives theUsageDetailmessage, computes the call and data cost, and sends aUsageCostDetailmessage as shown:
using Microsoft.Extensions.Logging;
using Steeltoe.Messaging.Handler.Attributes;
using Steeltoe.Stream.Attributes;
using Steeltoe.Stream.Messaging;
using System;

namespace UsageProcessor
{
    [EnableBinding(typeof(IProcessor))]
    public class UsageProcessor
    {
        private static ILogger<UsageProcessor> _logger;

        private double _ratePerSecond = 0.1;

        private double _ratePerMB = 0.05;

        public UsageProcessor(ILogger<UsageProcessor> logger)
        {
            _logger = logger ?? NullLogger<UsageProcessor>.Instance;
        }

        [StreamListener(IProcessor.INPUT)]
        [SendTo(IProcessor.OUTPUT)]
        public UsageCostDetail Handle(UsageDetail usageDetail)
        {
            return new UsageCostDetail
            {
                UserId = usageDetail.UserId,
                CallCost = usageDetail.Duration * _ratePerSecond,
                DataCost = usageDetail.Data * _ratePerMB
            };
        }
    }
}
In the preceding application, the [EnableBinding] attribute indicates that you want to bind your application to the messaging middleware. The attribute takes one or more interfaces as a parameter, in this case, the IProcessor that defines and input and output channel.
The [StreamListener] attribute binds the application's input channel to the Handle method and automatically deserializes the incoming JSON into UsageDetail object.
The [SendTo] attribute sends the Handle method's output to the application's output channel, which is in turn, sent to the a RabbitMQ message broker by using a TopicExchange.
Configuration
When configuring the processor application, we need to set the following properties:
- The
inputbinding destination (RabbitMQ exchange) where this application is subscribed through ananonymousauto-delete ordurablequeue. - The
groupto specify the consumer group to which this consumer application belongs. - The
outputbinding destination (RabbitMQ exchange) where the producer publishes the data. - The
requiredGroupsto specify the consumer groups to ensure the message delivery guarantee.
In appsettings.json, you can add the following properties:
{
    "Spring": {
        "Cloud": {
            "Stream": {
                "Bindings": {
                    "Input": {
                        "Destination": "usage-detail",
                        "Group": "usage-cost-customer"
                    },
                    "Output": {
                        "Producer": {
                        "RequiredGroups": "logger"
                        },
                        "Destination": "usage-cost"
                    }
                }
            }
        }
    }
}
- The
Spring:Cloud:Stream:Bindings:Input:DestinationandSpring:Cloud:Stream:Bindings:Input:Groupproperties bind theUsageCostProcessorobject'sinputto theusage-detailRabbitMQ exchange through theusage-detail.usage-cost-consumerdurable queue. - The
Spring:Cloud:Stream:Bindings:Output:destinationproperty binds theUsageCostProcessorobject's output to theusage-costRabbitMQ exchange. - The
spring"cloud:stream:bindings:output:producer:requiredGroupsproperty tells Steeltoe to make sure a durable queue namedusage-cost.loggerexists for consumption of theusage-costRabbitMQ exchange.
There are many configuration options that you can choose to extend or override to achieve the desired runtime behavior when using RabbitMQ as the message broker. The RabbitMQ-specific binder configuration properties are listed in the RabbitMQ-binder documentation
Sink
In this step, we create the UsageCostLogger sink.
Create a new .NET Console project and add the NuGet packages as referred in the Add NuGet reference
Business Logic
To create the business logic:
- Create a
UsageCostDetailclass that looks like UsageCostDetail.cs. TheUsageCostDetailclass containsUserId,CallCost, andDataCostproperties. - Create the
UsageCostLoggerclass, which receives theUsageCostDetailmessage and logs it. The following listing shows the source code:
using Microsoft.Extensions.Logging;
using Steeltoe.Stream.Attributes;
using Steeltoe.Stream.Messaging;
using System;

namespace UsageLogger
{
    [EnableBinding(typeof(ISink))]
    public class UsageLogger
    {
        private static ILogger<UsageLogger> _logger;

        public UsageLogger(ILogger<UsageLogger> logger)
        {
            _logger = logger ?? NullLogger<UsageLogger>.Instance;
        }

        [StreamListener(IProcessor.INPUT)]
        public void Handle(UsageCostDetail costDetail) =>
            _logger.LogInformation("Received UsageCostDetail " + costDetail);

    }
}
In the preceding application, the [EnableBinding] attribute indicates that you want to bind your application to the messaging middleware. The attribute takes one or more interfaces as a parameter, in this case, the ISink interface that defines an input channel.
The [StreamListener] attribute binds the application's input channel to the process method by converting the incoming JSON to a UsageCostDetail object.
Configuration
When configuring the sink application, we need to set:
- The
inputbinding destination (RabbitMQ exchange) to which this application is subscribed through ananonymousauto-delete ordurablequeue. - The
groupto specify the consumer group to which this consumer application belongs.
In appsettings.json, you can add the following properties:
{
  "Spring": {
    "Cloud": {
      "Stream": {
        "Bindings": {
          "Input": {
            "Group": "logger",
            "Destination": "usage-cost"
          }
        }
      }
    }
  }
}
The Spring:Cloud:Stream:Bindings:Input:Destination and Spring:Cloud:Stream:Bindings:Input:Group properties bind the UsageCostLogger object's input to the usage-cost RabbitMQ exchange through the usage-cost.logger durable queue.
Deployment
In this section, we deploy the applications created earlier to the local machine, Cloud Foundry, and Kubernetes.
When you deploy these three applications (UsageDetailSender, UsageCostProcessor, and UsageCostLogger), the flow of message is as follows:
UsageDetailSender -> UsageCostProcessor -> UsageCostLogger
The UsageDetailSender source application's output is connected to the UsageCostProcessor processor application's input.
The UsageCostProcessor application's output is connected to the UsageCostLogger sink application's input.
When these applications run, the RabbitMQ binder binds the applications' output and input boundaries into the corresponding exchanges and queues at RabbitMQ message broker.
Local
You can run the applications as standalone applications on your local environment.
To install and run the RabbitMQ docker image, run the following command:
docker run -d --hostname rabbitmq --name rabbitmq -p 15672:15672 -p 5672:5672 rabbitmq:3.7.14-management
Once installed, you can log in to the RabbitMQ management console on your local machine on http://localhost:15672.
You can use the default account username and password: guest and guest.
Running the UsageDetailSender Source
By using the pre-defined configuration properties (along with a unique server port) for UsageSender, you can run the application, as follows:
cd UsageSender
dotnet build && dotnet run --framework net6.0
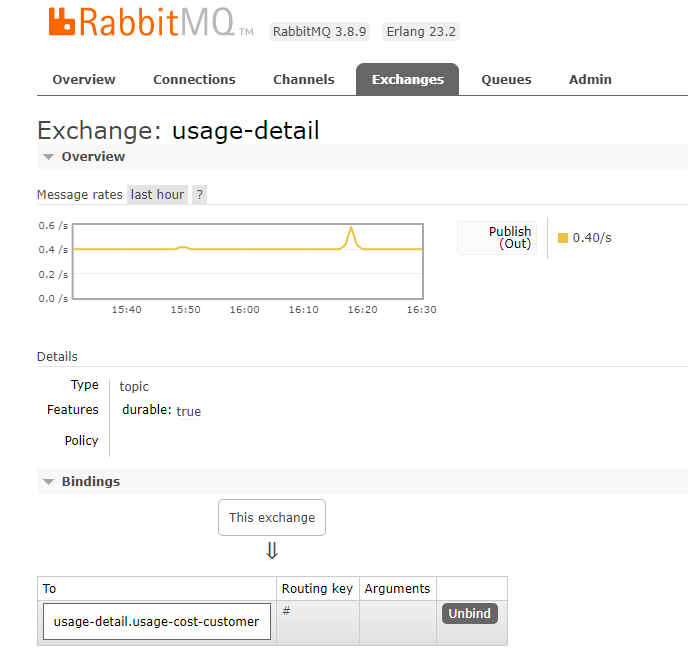
When this application is running, you can see that the usage-detail RabbitMQ exchange is created and a queue named usage-detail.usage-cost-consumer is bound to this exchange, as the following example shows:
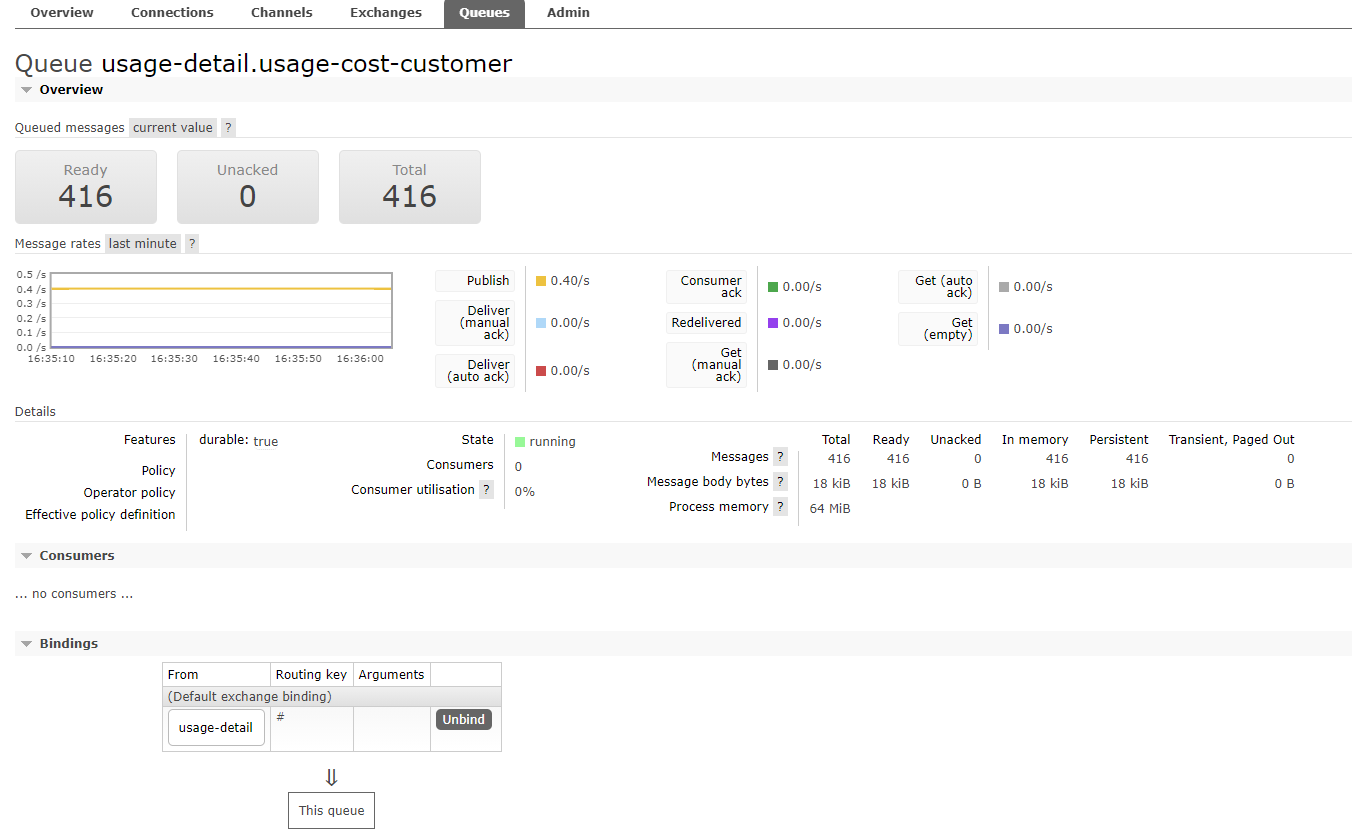
Also, if you click on the Queues and check the queue usage-detail.usage-cost-consumer, you can see the messages being consumed and stored in this durable queue, as the following example shows:
When configuring the consumer applications for this Source application, you can set the group binding property to connect to the corresponding queue.
NOTE: If you do not set the
requiredGroupsproperty, you can see that there is noqueuefor consuming the messages from theusage-detailexchange and, therefore, the messages are lost if the consumer is not up before this application is started.
Running the Processor
By using the pre-defined configuration properties (along with a unique server port) for UsageProcessor, you can run the application, as follows:
cd UsageProcessor
dotnet build && dotnet run --framework net6.0
From the RabbitMQ console, you can see:
- The
UsageProcessorapplication consumes from theusage-detail.usage-cost-consumerdurable queue, based on theSpring:Cloud:Stream:Bindings:Input:group=usage-cost-consumersetting. - The
UsageProcessorapplication produces theUsageCostDetailand sends it to the exchangeusage-cost, based on theSpring:Cloud:Stream:Bindings:Output:Destination=usage-costsetting. - The
usage-cost.loggerdurable queue is created. It consumes the messages from theusage-costexchange, based on theSpring:Cloud:Stream:Bindings:Output:Producer:RequiredGroups=loggerproperty.
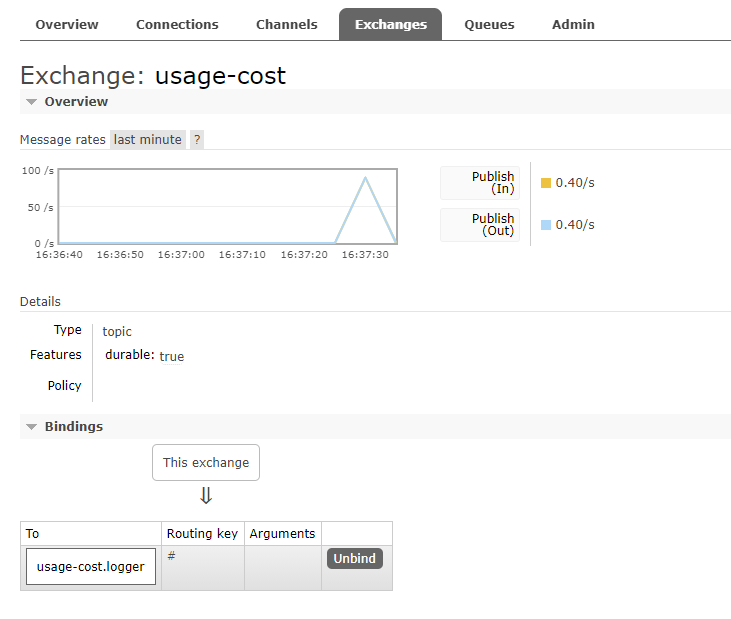
When this application is running, you can see that the usage-cost RabbitMQ exchange is created and the queue named usage-cost.logger is bound to this exchange, as the following image shows:
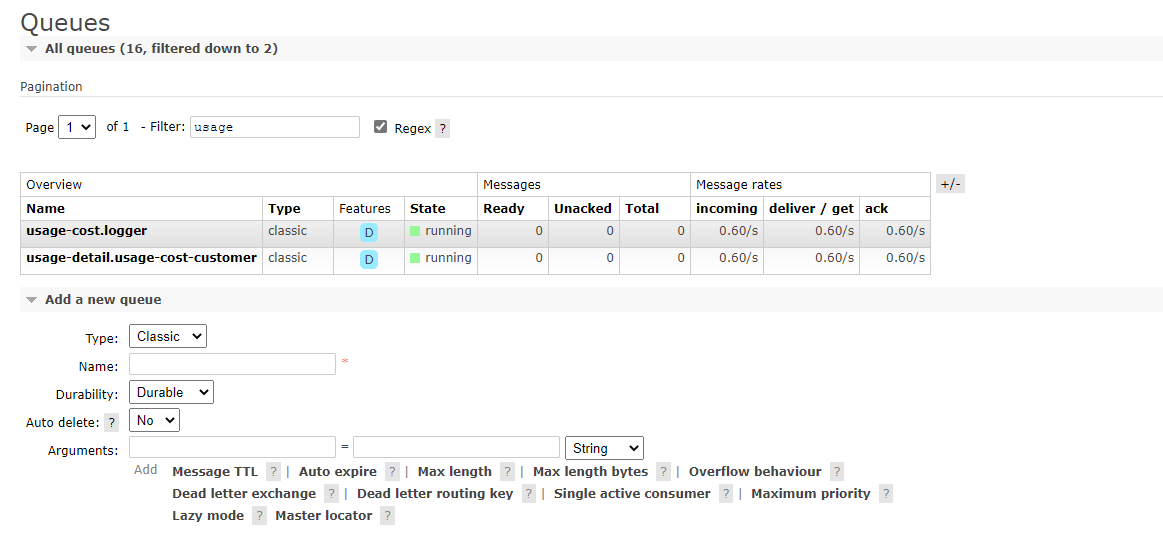
Also, if you click on the Queues and check the usage-cost.logger queue, you can see the messages being consumed and stored in this queue, as the following image shows:
Running the Sink
By using the pre-defined configuration properties (along with a unique server port) for UsageLogger, you can run the application, as follows:
cd UsageLogger
dotnet build && dotnet run --framework net6.0
Now you can see that this application logs the usage cost detail it receives from the usage-cost RabbitMQ exchange through the usage-cost.logger durable queue, as the following example shows:
info: UsageLogger.UsageLogger[0]
      Received UsageCostDetail { "UserId" "user3", "CallCost": "$12.90", "DataCost": "$28.95" }
info: UsageLogger.UsageLogger[0]
      Received UsageCostDetail { "UserId" "user4", "CallCost": "$17.40", "DataCost": "$14.45" }
info: UsageLogger.UsageLogger[0]
      Received UsageCostDetail { "UserId" "user4", "CallCost": "$7.50", "DataCost": "$9.45" }
info: UsageLogger.UsageLogger[0]
      Received UsageCostDetail { "UserId" "user5", "CallCost": "$17.40", "DataCost": "$30.80" }
info: UsageLogger.UsageLogger[0]
      Received UsageCostDetail { "UserId" "user1", "CallCost": "$28.80", "DataCost": "$6.75" }
info: UsageLogger.UsageLogger[0]
      Received UsageCostDetail { "UserId" "user5", "CallCost": "$8.50", "DataCost": "$10.00" }
info: UsageLogger.UsageLogger[0]
      Received UsageCostDetail { "UserId" "user2", "CallCost": "$17.30", "DataCost": "$19.65" }
info: UsageLogger.UsageLogger[0]
      Received UsageCostDetail { "UserId" "user3", "CallCost": "$5.90", "DataCost": "$13.25" }
Cloud Foundry
This section walks you through how to deploy the UsageDetailSender, UsageCostProcessor, and UsageCostLogger applications on your Cloud Foundry environment.
Creating a RabbitMQ service
To create a RabbitMQ service:
- Log in to the CloudFoundry environment with your credentials.
- From the CF market place, create a RabbitMQ service instance.
cf create-service p-rabbitmq standard stream-rabbitmq
Cloud Foundry Deployment
To deploy on Cloud Foundry:
- Create a CF manifest YAML for the
UsageDetailSenderas follows:
applications:
- name: usage-sender
  buildpacks:
   - dotnet_core_buildpack
  memory: 128M
  disk_quota: 512M
  command: cd ${HOME} && ./UsageSender
  env:
    ASPNETCORE_ENVIRONMENT: Development
  services:
   - stream-rabbitmq
Push the UsageDetailSender application by using its manifest YAML file, as follows:
cd UsageSender
dotnet publish -f net6.0 -r linux-x64 -o publish
cf push -f manifest.yml
Create a CF manifest YAML file for the UsageProcessor as follows:
applications:
- name: usage-processor
  buildpacks:
   - dotnet_core_buildpack
  memory: 128M
  disk_quota: 512M
  command: cd ${HOME} && ./UsageProcessor
  env:
    ASPNETCORE_ENVIRONMENT: Development
  services:
   - stream-rabbitmq
Push the UsageProcessor application by using its manifest YAML file, as follows:
cd UsageProcessor
dotnet publish -f net6.0 -r linux-x64 -o publish
cf push -f manifest.yml
Create a CF manifest YAML file for the UsageLogger as follows:
applications:
- name: usage-logger
  buildpacks:
   - dotnet_core_buildpack
  memory: 128M
  disk_quota: 512M
  command: cd ${HOME} && ./UsageLogger
  env:
    ASPNETCORE_ENVIRONMENT: Development
  services:
   - stream-rabbitmq
Push the UsageLogger application by using its manifest YAML file, as follows:
cd UsageLogger
dotnet publish -f net6.0 -r linux-x64 -o publish
cf push -f manifest.yml
You can see the applications running by using the cf apps command, as follows:
cf apps
The following listings shows typical output:
name              requested state   processes   routes
usage-logger      started           web:1/1     usage-logger.apps.pcfone.io
usage-processor   started           web:1/1     usage-processor.apps.pcfone.io
usage-sender      started           web:1/1     usage-sender.apps.pcfone.io
2021-06-08T15:39:57.62-0400 [APP/PROC/WEB/0] OUT info: UsageLogger.UsageLogger[0]
2021-06-08T15:39:57.62-0400 [APP/PROC/WEB/0] OUT       Received UsageCostDetail { "UserId" "user4", "CallCost": "$21.30", "DataCost": "$31.40" }
2021-06-08T15:40:02.63-0400 [APP/PROC/WEB/0] OUT info: UsageLogger.UsageLogger[0]
2021-06-08T15:40:02.63-0400 [APP/PROC/WEB/0] OUT       Received UsageCostDetail { "UserId" "user3", "CallCost": "$1.30", "DataCost": "$27.20" }
2021-06-08T15:40:07.63-0400 [APP/PROC/WEB/0] OUT info: UsageLogger.UsageLogger[0]
2021-06-08T15:40:07.63-0400 [APP/PROC/WEB/0] OUT       Received UsageCostDetail { "UserId" "user2", "CallCost": "$5.60", "DataCost": "$29.30" }
2021-06-08T15:40:12.62-0400 [APP/PROC/WEB/0] OUT info: UsageLogger.UsageLogger[0]
2021-06-08T15:40:12.62-0400 [APP/PROC/WEB/0] OUT       Received UsageCostDetail { "UserId" "user4", "CallCost": "$0.40", "DataCost": "$26.15" }
Running on Kubernetes
This section walks you through how to deploy the three Stream Stream applications on Kubernetes.
Setting up the Kubernetes cluster
For this example, we need a running Kubernetes cluster. For this example, we deploy to Docker for Windows Desktop with integrated Kubernetes.
Verifying Kubernetes is running
To verify that you have a running Kubernetes instance, run the following command (show with sample output):
kubectl config get-contexts
CURRENT   NAME             CLUSTER          AUTHINFO         NAMESPACE
*         docker-desktop   docker-desktop   docker-desktop

kubectl config use-context docker-desktop
Switched to context "docker-desktop".
Installing RabbitMQ
You can install the RabbitMQ message broker by using the default configuration from Spring Cloud Data Flow. To do so, run the following command:
kubectl apply -f https://raw.githubusercontent.com/spring-cloud/spring-cloud-dataflow/main/src/kubernetes/rabbitmq/rabbitmq-deployment.yaml -f https://raw.githubusercontent.com/spring-cloud/spring-cloud-dataflow/main/src/kubernetes/rabbitmq/rabbitmq-svc.yaml
Building the Docker Images
To build the Docker images, we use a Dockerfile for each of the three applications. For example the UsageSender Dockerfile looks like this:
FROM mcr.microsoft.com/dotnet/sdk:5.0 AS build
WORKDIR /source

COPY *.csproj .
RUN dotnet restore

COPY . .
RUN dotnet publish -f net6.0 -c release -o /app

FROM mcr.microsoft.com/dotnet/aspnet:5.0
WORKDIR /app
COPY --from=build /app .

ENV SPRING_RABBITMQ_HOST=host.docker.internal
ENV PORT=8080

ENTRYPOINT ["dotnet", "UsageSender.dll"]
Then use the docker build command to build, tag and publish to your repository:
docker build . -t <your-repo>/usagelogger
Deploying the Stream
To deploy the stream, you must first copy and paste the following YAML content and save it to usage-cost-stream.yaml
kind: Pod
apiVersion: v1
metadata:
  name: usage-detail-sender
  labels:
    app: usage-cost-stream
spec:
  containers:
    - name: usage-detail-sender
      image: <your-repo>/usagesender:latest
      ports:
        - containerPort: 8080
          protocol: TCP
      env:
        - name: SPRING_RABBITMQ_ADDRESSES
          value: rabbitmq
        - name: SERVER_PORT
          value: '8080'
  restartPolicy: Always

---
kind: Pod
apiVersion: v1
metadata:
  name: usage-processor
  labels:
    app: usage-cost-stream
spec:
  containers:
    - name: usage-processor
      image: <your-repo>/usageprocessor:latest
      ports:
        - containerPort: 8080
          protocol: TCP
      env:
        - name: SPRING_RABBITMQ_ADDRESSES
          value: rabbitmq
        - name: SERVER_PORT
          value: '8080'
  restartPolicy: Always

---
kind: Pod
apiVersion: v1
metadata:
  name: usage-logger
  labels:
    app: usage-cost-stream
spec:
  containers:
    - name: usage-logger
      image: <your-repo>/usagelogger:latest
      ports:
        - containerPort: 8080
          protocol: TCP
      env:
        - name: SPRING_RABBITMQ_ADDRESSES
          value: rabbitmq
        - name: SERVER_PORT
          value: '8080'
  restartPolicy: Always
Then you can deploy the apps, as follows:
kubectl apply -f usage-cost-stream.yaml
If all is well, you should see the following output:
pod/usage-detail-sender created
pod/usage-cost-processor created
pod/usage-cost-logger created
The preceding YAML specifies three pod resources, for the source, processor, and sink applications. Each pod has a single container that references the respective docker image.
We set the logical hostname for the RabbitMQ broker for each app to connect to it. Here we use the RabbitMQ service name, rabbitmq in this case. We also set the label app: user-cost-stream to logically group our apps.
Verifying the Deployment
To verify the deployment, use the following command to tail the log for the usage-cost-logger sink:
kubectl logs -f usage-logger
You should see messages similar to the following streaming:
info: UsageLogger.UsageLogger[0]
      Received UsageCostDetail { "UserId" "user3", "CallCost": "$12.90", "DataCost": "$28.95" }
info: UsageLogger.UsageLogger[0]
      Received UsageCostDetail { "UserId" "user4", "CallCost": "$17.40", "DataCost": "$14.45" }
info: UsageLogger.UsageLogger[0]
      Received UsageCostDetail { "UserId" "user4", "CallCost": "$7.50", "DataCost": "$9.45" }
info: UsageLogger.UsageLogger[0]
      Received UsageCostDetail { "UserId" "user5", "CallCost": "$17.40", "DataCost": "$30.80" }
Cleaning Up
To delete the stream, we can use the label we created earlier, as follows:
kubectl delete pod -l app=usage-cost-stream
To uninstall RabbitMQ, run the following command:
kubectl delete all -l app=rabbitmq
What's Next
You can use Spring Cloud Data Flow to deploy the three applications, as detailed in Steeltoe Stream Processing using Spring Cloud Data Flow.